Article non traduit actuellement, demandez la ou essayez la version anglaise ici (outil de traduction disponible) :

Python applied to HVAC
Article non traduit actuellement, demandez la ou essayez la version anglaise ici (outil de traduction disponible) :
Even when you master it. Connecting MEP elements in order to get a fully functional system with flow and pressure loss calculation is a pain. So learn Revit API ways to connect things is a good way help you manage this.
Connector manager is the way to retrieve connectors and all info about it. When you talk about MEP elements there is 2 main kind of elements. MEPCurve (duct, pipe, cable tray, wire etc…) and FamilyInstance (fittings, mechanical equipments, plug, lights etc…) and ConnectorManager is retrieved in 2 different ways :
MEPCurve -> MEPCurve.ConnectorManager
FamilyInstance -> FamilyInstance.MEPModel.ConnectorManager
So it is handy to have a function to retrieve it on any object :
def get_connector_manager(element):
    # type: (Element) -> ConnectorManager
    """Return element connector manager"""
    try:
        # Return ConnectorManager for pipes, ducts etc…
        return element.ConnectorManager
    except AttributeError:
        pass

    try:
        # Return ConnectorManager for family instances etc…
        return element.MEPModel.ConnectorManager
    except AttributeError:
        raise AttributeError("Cannot find connector manager in given element")
As much as I know there is no way to ask user to select a connector. So you need to figure out what connector user want to designate. A good way is to check which connector is the closest (e.g. closest to user selection point or to an other object). A function to check this is then also handy :
def get_connector_closest_to(connectors, xyz):
    # type: (ConnectorSet, XYZ) -> Connector
    """Get connector from connector set iterable closest to an XYZ point"""
    min_distance = float("inf")
    closest_connector = None
    for connector in connectors:
        distance = connector.Origin.DistanceTo(xyz)
        if distance < min_distance:
            min_distance = distance
            closest_connector = connector
    return closest_connector
This is actually really easy. Every connector has a Connector.ConnectTo(<other_connector>) method. This method is very permissive both connectors do not need to be at the same place which is a good thing. That’t how you can connect lights, plugs etc… to their panel without any physical connection. And it can lead to funny things :
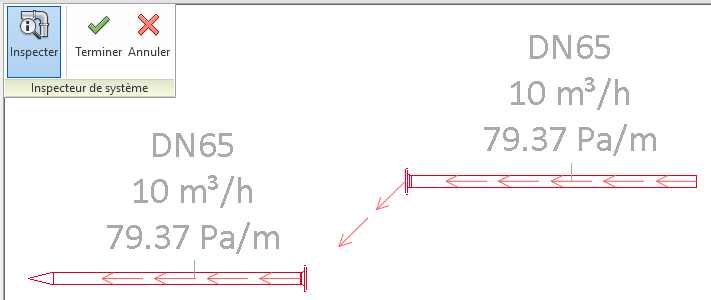
How many architect have dreamed of wireless piping and ventilation ?
Logical connection only for duct and pipes is funny but also unstable and it is not what we want to achieve right ? So we also want them to be physically connected.
Each connectors has it’s own coordinate system. If you do families you have probably noticed that if you don’t set it correctly it leads to strange behaviour. Basis X and Y define the plane to land the other connector. Basis Z show in which direction connection is made. When 2 connectors are connected their origin has same coordinates, XY planes are coplanar and their Z basis are in opposite direction.
We need to handle 3 cases :
# If connector direction is same, rotate it
angle = moved_direction.AngleTo(target_direction)
if angle != pi:
    if angle == 0:
        vector = moved_connector.CoordinateSystem.BasisY
    else:
        vector = moved_direction.CrossProduct(target_direction)
    try:
        line = Line.CreateBound(moved_point, moved_point+vector)
        moved_element.Location.Rotate(line, angle - pi)
    # Revit don't like angle and distance too close to 0
    except Exceptions.ArgumentsInconsistentException:
        logger.debug("Vector : {} ; Angle : {}".format(vector, angle))
Easy part. We just need to translate one of the object by the difference of both connectors origin.
moved_element.Location.Move(target_connector.Origin - moved_connector.Origin)
We can now ask user to select the object+connector he wants to connect and the target object+connector.
PickObject from Autodesk.Revit.UI.Selection namespace do not return an element as we could expect but a Reference. In our case, it is pretty useful as a Reference has a GlobalPoint property which stores where (XYZ) the user clicked on the object. Then we just use our get_connector_closest_to function.
I also wanted to point out one of the pyRevit feature introduced in 4.5 : the WarningBar which is a much more visible way to show user what to do. It looks like this :
 It can be used very easily with in a
 with statement. It shows up when you enter and vanishes when you exit :
with forms.WarningBar(title="Pick element to move and connect"):
    reference = uidoc.Selection.PickObject(ObjectType.Element, NoInsulation(), "Pick element to move")
You maybe noticed the NoInsulation ISelectionFilter I introduced as a parameter in PickObject prompt. It just prevent user from selecting insulation and objects that don’t have a connector manager.
class NoInsulation(ISelectionFilter):
    def AllowElement(self, elem):
        if isinstance(elem, InsulationLiningBase):
            return False
        try:
            get_connector_manager(elem)
            return True
        except AttributeError:
            return False

    def AllowReference(self, reference, position):
        return True
As always you can take a look at full source code under GPLv3 License on pyRevitMEP repository.
Article non traduit actuellement, demandez la ou essayez la version anglaise ici (outil de traduction disponible) :
Best wishes for 2018 and pyRevitMEP extension update for pyRevit 4.5
pyRevit 4.5 has been released on 01.01.2018 with huge improvements. Make sure to check Ehsan post if you are interested to discover main new features.

Some change breaking have required some change on pyRevitMEP but thanks to Ehsan explanation videos and docs it was a piece of cake.
On an other hand, I added many new features to pyRevitMEP (some in labs) but I lack of time to write articles on new features at the moment.
To get all updates Make sure to :
I wish all the best for 2018 and hope that we’ll all get a little more open source code, engineering, agriculture etc…
Check http://opensourceecology.org/ they do great things !
Article non traduit actuellement, demandez la ou essayez la version anglaise ici (outil de traduction disponible) :
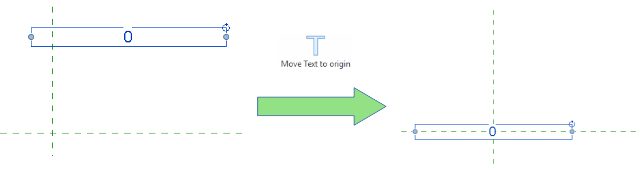
[pyRevit] Move labels in annotation families to origin (0,0)
Some very simple script can help you achieve tasks of missing features in Revit. As much as I know there is no way to accurately place a label to origin manually. A way to place it as well as possible is to put 0 as sample value and try to align it as well as possible by zooming. Sometimes when you activate a leader your line isn’t straight even if your annotation is perfectly perpendicular to your object just because your annotation family is not perfectly aligned on 0,0. The following very simple script will solve it your annotation family will be perfectly aligned on 0,0 :
# coding: utf8
import rpw
from rpw import DB

__doc__ = "Designed for annotation families. It moves selected annotation to center (set 0,0,0 coordinates)"
__title__ = "Center Text"
__author__ = "Cyril Waechter"
__context__ = 'Selection'

with rpw.db.Transaction():
 for text_element in rpw.ui.Selection():
 text_element.Coord = DB.XYZ()
 The tool is available in pyRevitMEP. Just update it from pyRevit tab.
Article non traduit actuellement, demandez la ou essayez la version anglaise ici (outil de traduction disponible) :
[Revit] Batch view renaming, regular expression, docstrings, a GUI
This batch renaming utility elaboration has been a long journey. I did a simple one long time ago which was supporting only 1 renaming pattern : http://pythoncvc.net/?p=27
We use parameters available in our views to rename them in a programmatic and logic way. My old script was using an home parameter for discipline and sub-discipline which is set by view template, level and scope box name to make it unique as much as possible.
Flexibility : clients, contractors or someone else may ask a specific naming pattern for views. So pattern need to be easily adaptable and savable.
Multilingual : as always, to avoid language dependent behaviour, when it is possible built in parameter name or shared parameter Guid shall be used to retrieve values.
Human readable : parameters storage type may be text, number, id etc… and have a better human readable AsValueString (it is the case for scope boxe).
Free separators choice : we should be able to freely choose and change separator, prefix, suffix between parameters
Flexible selection of view to rename : be able to rename X views then select Y other views and rename it and so on.
I was thinking about common file re-namers like Ant Renamer. User is able to type parameters as a simple string and add anything he wants between them. The string looks like the old string formatting style with %s %d etc…
So my first attempt was to use python string format like "string{Guid.<Guid>}_{bip.<BuiltInParameterName>_{<parameter_name>}".format(parameter_by_Guid.value, parameter_by_builtinparameter.value, parameter_by_name.value). That was working but somehow it felt weird and slow.
I finally used regular expressions which are very much used for this kind of task in a very efficient way (spelling correction, retrieve a phone number, verify that an email entered by a user looks like one etc…).
So we needed a regular expression to retrieve parameters by Guid :
# Create a regular expression to retrieve Guid (including constructor) in a string
parameterGuidRegex = re.compile(r'''
Guid\( # Guid constructor. Example : Guid("F9168C5E-CEB2-4faa-B6BF-329BF39FA1E4")
[\" | \'] # Single or double quote required in Guid constructor
([0-9a-f]{8} # First 8 hexa
(-?[0-9a-f]{4}){3} # Optional separator + 4 hexa 3 times
-?[0-9a-f]{12}) # Optional separator + 12 hexa
[\" | \'] # Single or double quote required in Guid constructor
\) # Close parenthesis necessary to build a Guid
''', re.IGNORECASE | re.VERBOSE)
… by BuiltInParameter (way far simpler) :
# Create a regular expression to retrieve BuiltInParameter in a string
parameterBipRegex = re.compile(r"bip\((\w+)\)")
… and finally by name :
# Create a regular expression to retrieve named parameters in a string
parameterNameRegex = re.compile(r"name\(([\w\s]+)\)") # Retrieve group(1)
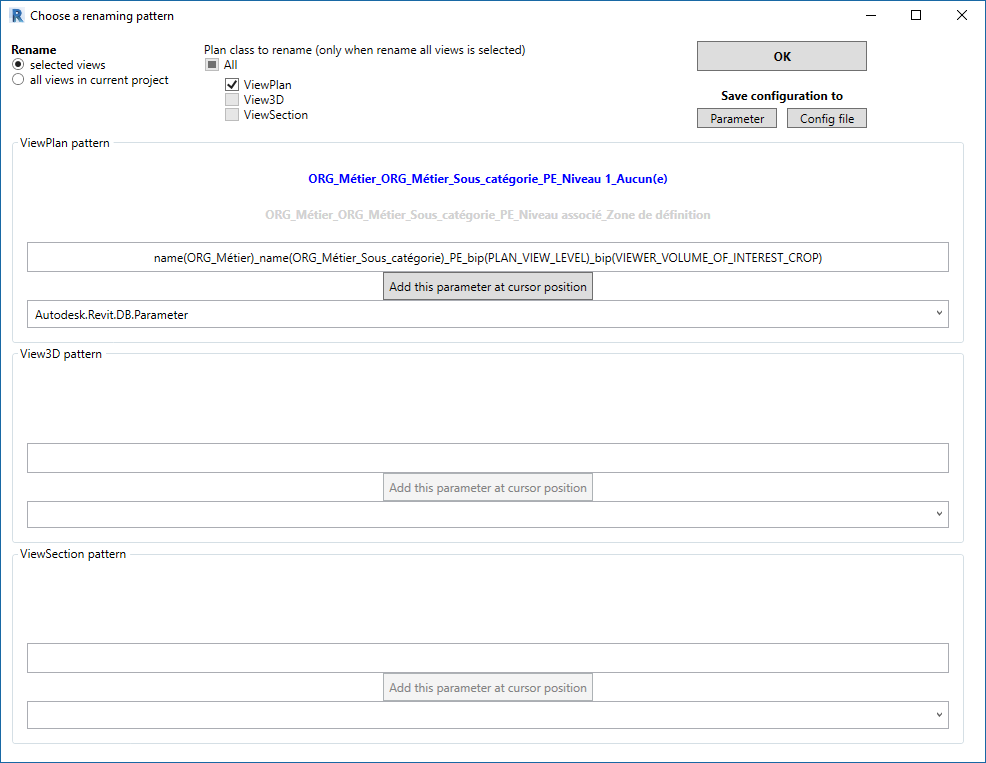
There is mainly 3 class of view (excluding schedules, legends etc…) : ViewPlan, View3D, ViewSection. Each kind don’t have the same available parameter. For example there is no level parameter in 3D and section views. So 3 pattern definition was required to batch rename views. To show available parameters to user a sample view of each class is retrieved and parameters Guid, BuiltInParameterName, and Name are stored as a dictionary.
To help user add parameter to pattern the best way. A function try to retrieve Guid else BuiltInParameter name else name.
Another function replace pattern by their associated parameter name and value to show user a preview.
A last function is in charge of actually renaming views.
A WPF GUI splitted in 4 part, 3 for each view classes, 1 for saving and validation options.
Thanks again to Ehsan, there is a very easy way to save script parameter to pyRevit config file. Don’t forget to encode and decode your string !
my_config = this_script.config
# Then in WPF class we have following method :

def save_config_click(self, sender, e):
 for view_class in self.view_class_dict.keys():
 view_class_checkbox = eval('self.cb_{}'.format(view_class))
 if view_class_checkbox.IsChecked:
 pattern_textbox = eval('self.{}_pattern'.format(view_class))
 setattr(my_config, view_class, pattern_textbox.Text.encode('utf8'))
 this_script.save_config()
But I wanted also to be able to save to a parameter for project specific naming rules. Unfortunately with Revit API it is still currently not possible to create a project parameter which is not shared. So based on Spiderinnet samples I wrote a function to create a shared parameter and store configuration in it as a string which is formatted in a dictionary/json style.
When script is launched. It tries to load configuration from project parameter (as project specific case should be use first) else from pyRevit config file (the way you name it on your office) else from default values (which are for most people just samples).
To be able to rename successively multiple selections of views it was mandatory to use a modelless WPF window and so to use ExternalEvent for any Transaction to Revit : create shared parameter, save to parameter, rename views. I described how to do so in a previous article but as there was 3 different action to make it was a good idea to enhance it. I made 2 class to be able to execute any function or method through the external event using *args and *kwargs :
class CustomizableEvent:
 def __init__(self):
 self.function_or_method = None
 self.args = ()
 self.kwargs = {}

 def raised_method(self):
 self.function_or_method(*self.args, **self.kwargs)

 def raise_event(self, function_or_method, *args, **kwargs):
 self.args = args
 self.kwargs = kwargs
 self.function_or_method = function_or_method
 custom_event.Raise()


customizable_event = CustomizableEvent()


# Create a subclass of IExternalEventHandler
class CustomHandler(IExternalEventHandler):
 """Input : function or method. Execute input in a IExternalEventHandler"""

 # Execute method run in Revit API environment.
 # noinspection PyPep8Naming, PyUnusedLocal
 def Execute(self, application):
 try:
 customizable_event.raised_method()
 except InvalidOperationException:
 # If you don't catch this exeption Revit may crash.
 print "InvalidOperationException catched"

 # noinspection PyMethodMayBeStatic, PyPep8Naming
 def GetName(self):
 return "Execute an function or method in a IExternalHandler"


# Create an handler instance and his associated ExternalEvent
custom_handler = CustomHandler()
custom_event = ExternalEvent.Create(custom_handler)
As usual full source code is available on github.
Thanks to all these resources which helped a lot
WPF tutorial :
string format :
Regular expressions :
https://www.udemy.com/automate/learn/v4/overview
https://automatetheboringstuff.com/chapter7/
https://docs.python.org/3.10/library/re.html
https://www.pcwdld.com/python-regex-cheat-sheet
Encoding :
http://sametmax.com/lencoding-en-python-une-bonne-fois-pour-toute/
Docstring :
http://sametmax.com/lencoding-en-python-une-bonne-fois-pour-toute/
https://www.python.org/dev/peps/pep-0257/
*args and **kwargs :
Article non traduit actuellement, demandez la ou essayez la version anglaise ici (outil de traduction disponible) : http://pythoncvc.net/?p=314
Thanks to his creator Ehsan Iran-Nejad and all credits we have a great tool named pyRevit. This tool allows us to easily make python scripts for Revit and distribute them via the extensions manager.
And it is exactly what I did by creating pyRevitMEP extension which has been added by Ehsan to pyRevit extensions manager last week-end :
pyRevitMEP philosophy : encourage MEP people to group-up and develop common tools. You want to contribute by coding : send a pull request on github or more (do not hesitate to contact me). If you prefer to manage your own extension, add your tools in the /pyRevitMEP.tab/ and follow instructions on pyRevit blog to add it to extensions manager. You want to contribute but don’t know how, check FAQ page. License is and will remain open source. It is currently under GNU GPL v3.0 License.