If previous article we used IfcOpenShell’s (IOS) standard settings to read an ifc geometry which was generating a mesh. To generate something else let’s take a look at available settings. If your IDE provide you a good auto-completion you are able to see what options you have but not their meaning. With a quick search in the IOS repo using one of the options as keyword you’ll quickly find an header file called IfcGeomIteratorSettings.h which contains all definitions :
/// Specifies whether to use the Open Cascade BREP format for representation
/// items rather than to create triangle meshes. This is useful is IfcOpenShell
/// is used as a library in an application that is also built on Open Cascade.
USE_BREP_DATA = 1 << 3,
BREP stands for Boundary representation which is probably what you want to use when modeling parametric ducts or pipes and their related components. You define settings in python as following :
If you write generated brep data to a file you will see that it is actually an Open Cascade BREP Format as suggested in setting’s description.
    shape = geom.create_shape(settings, ifc_entity)
    # occ stands for OpenCascade
    occ_shape = shape.geometry.brep_data

    # IfcOpenShell generate an Open Cascade BREP
    with open("IfcOpenShellSamples/brep_data", "w") as file:
        file.write(occ_shape)
Fortunately Part module considered as a the core component of FreeCAD is also based on Open Cascade which makes the import of the geometry into FreeCAD as simple as :
    # Create FreeCAD shape from Open Cascade BREP
    fc_shape = Part.Shape()
    fc_shape.importBrepFromString(occ_shape)

    # Ifc lenght internal unit : meter. FreeCAD internal unit : mm.
    fc_shape.scale(1000)

    # Add geometry to FreeCAD scenegraph (Coin)
    fc_part = doc.addObject("Part::Feature", "IfcPart")
    fc_part.Shape = fc_shape
Don’t forget to import Part instead of Mesh at the top of your file.
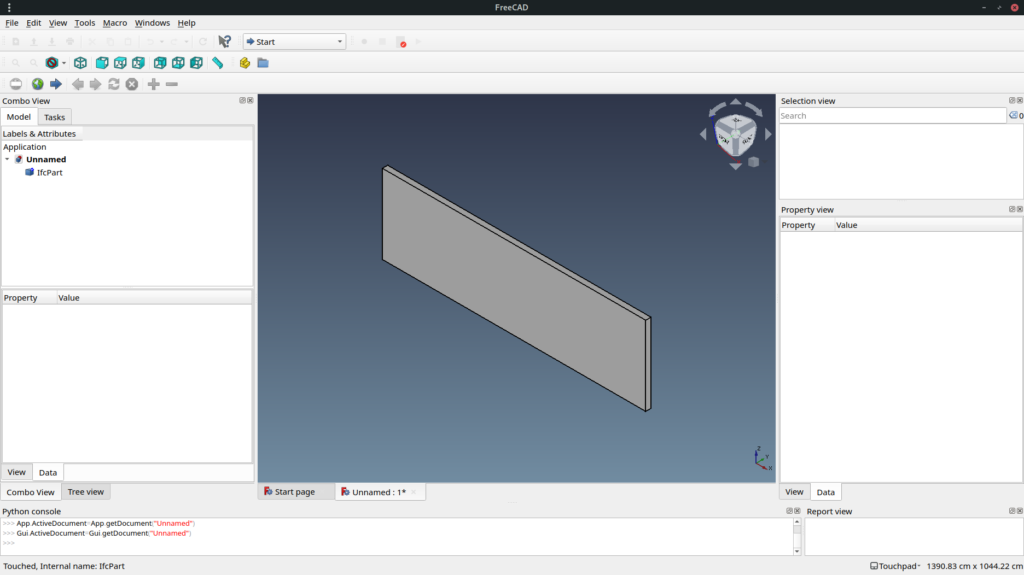
If we use full code available here to generate geometry for wall from my previous article you get the same volume but this time is not a mesh (no triangles) :
IfcWall imported as a BRep
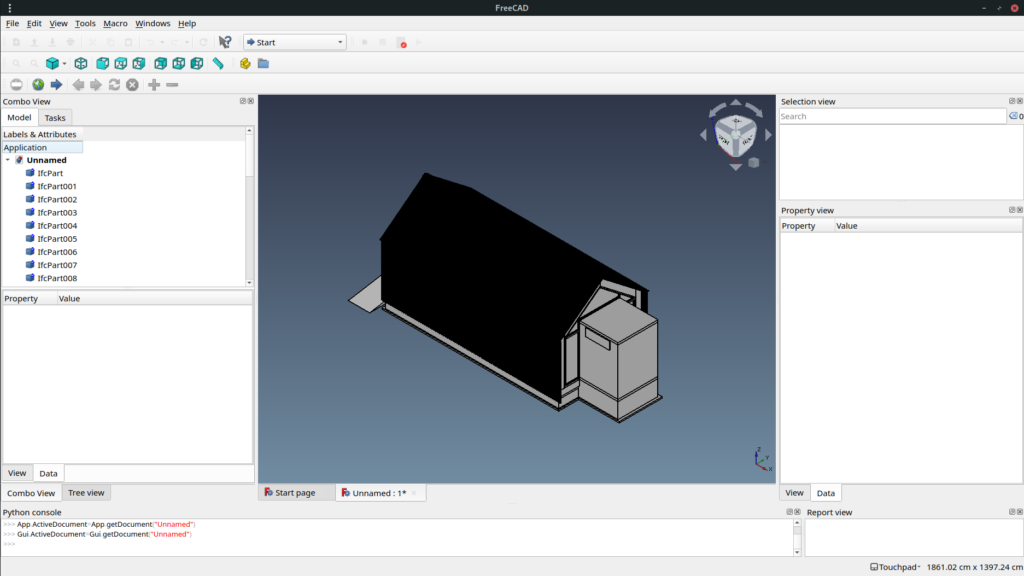
If now instead for importing only IfcWall entities we import IfcElement entities from wikilab.ifc a wikihouse project. We get following geometries :
wikilab.ifc imported as Brep
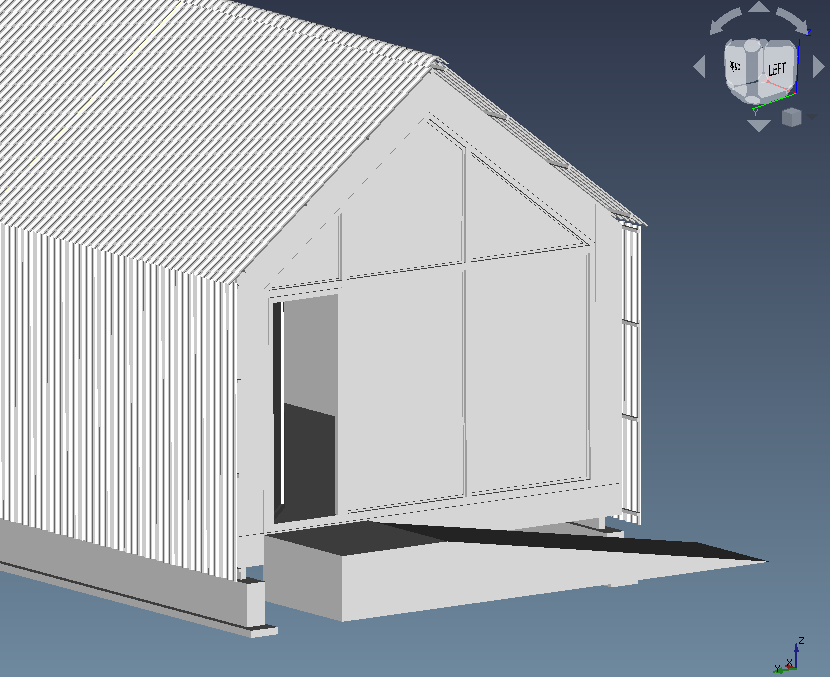
Of course FreeCAD still has a very better way to import it but if you activate shaded mode you get something nicer :
wikilab.ifc shaded mode
Next article will talk about location point and placement. How object IfcOpenShell reads it ? How does it take care of Local Coordinate System, Coordinate System Reference etc…
IfcOpenShell is a library used to work with IFC schema. This library is licensed under LGPL 3.0 (libre and open source).
Some features included :
Parse ifc
Create geom from ifc representation
Display geom using pythonOCC
Ifc importer for Blender
Ifc importer for 3ds Max
Convert geometry to many formats
Some projects using IfcOpenShell :
FreeCAD : parametric CAD modeler including a BIM workbench
BIMserver : Multi-user self-hostable BIM platform with a plugin ecosystem to view, analyse, merge etc…
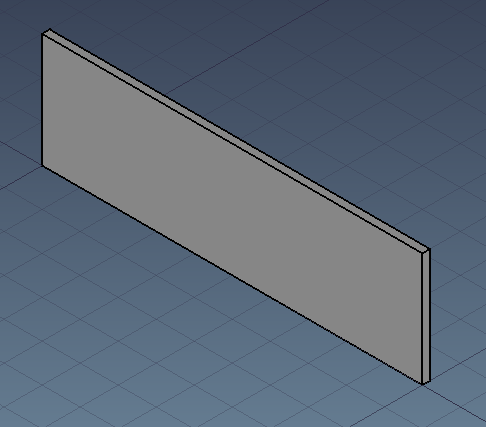
In this article we will use a function which generate a mesh from an ifc entity in our case an IfcWall and see what we get. A simple wall created with FreeCAD and exported to .ifc :
Base wall created in FreeCAD
Prerequisite : IfcOpenShell installed. Version used here : 0.6.0a1
First we need to import ifcopenshell and open the ifc file :
geom.settings is used to set conversion options. By default, ifcopenshell generate a mesh with vertices, edges and faces. ifc_file.by_type("IfcClass") is a very handy way to get all element of a chosen class (including subclass). So if for example you IfcBuildingElement it will also include IfcWall, IfcWindow, IfcSlab, IfcBeam etc… geom.create_shape(settings, ifc_entity) is the function which convert the ifc entity into a mesh. We can observe that vertices are stored in a single tuple not by xyz triplet. Same for edges and faces.
It is obvious that vertices are x,y,z triplet one by one. But how are defined edges and faces ? An edge is a line bounded by 2 vertices but values we see are not vertices. A face in a mesh is a triangle surface bounded by 3 vertices and 3 edges. If we make a set of edges and faces values we get a set of length 8.
        print(set(ios_edges))
        print(set(ios_faces))
        """ Above will result in :
{0, 1, 2, 3, 4, 5, 6, 7}
{0, 1, 2, 3, 4, 5, 6, 7}
"""
If we group vertices by by 3 values (x,y,z), edges by 2 (vertex1, vertex2), and faces by 3 (3 vertices or 3 edges) we see that our wall geometry is defined by 8 vertices, 24 edges and 12 faces. Edges and faces values are both referring vertices indexes.
        # Let's parse it and prepare it for FreeCAD import
        vertices = [
            FreeCAD.Vector(ios_vertices[i : i + 3])
            for i in range(0, len(ios_vertices), 3)
        ]
        edges = [ios_edges[i : i + 2] for i in range(0, len(ios_edges), 2)]
        faces = [tuple(ios_faces[i : i + 3]) for i in range(0, len(ios_faces), 3)]

        print(
            f"This {ifc_entity.is_a()} has been defined by {len(vertices)} vertices, {len(edges)} edges and {len(faces)} faces"
        )
        print(vertices)
        print(edges)
        print(faces)
        """ Above will result in :
This IfcWall has been defined by 8 vertices, 24 edges and 12 faces
[(0.0, 0.0, 0.0), (0.0, 0.0, 3.0), (10.0, 0.0, 0.0), (10.0, 0.0, 3.0), (10.0, 0.2, 0.0), (10.0, 0.2, 3.0), (0.0, 0.2, 0.0), (0.0, 0.2, 3.0)]
[(0, 1), (1, 3), (0, 2), (2, 3), (2, 3), (2, 4), (3, 5), (4, 5), (4, 5), (5, 7), (4, 6), (6, 7), (6, 7), (0, 6), (1, 7), (0, 1), (0, 6), (0, 2), (4, 6), (2, 4), (1, 7), (1, 3), (5, 7), (3, 5)]
[(1, 0, 3), (3, 0, 2), (3, 2, 4), (5, 3, 4), (5, 4, 7), (7, 4, 6), (7, 6, 0), (1, 7, 0), (0, 6, 2), (2, 6, 4), (3, 7, 1), (5, 7, 3)]
"""
        return {"vertices": vertices, "edges": edges, "faces": faces}
Of course FreeCAD already has a better way to import an IfcWall but let’s use our mesh to generate a geometry :
import FreeCAD
import FreeCADGui
import Mesh

if __name__ == "__main__":
    mesh_values = read_geom(
        "/home/cyril/git/pythoncvc.net/IfcOpenShellSamples/Wall.ifc"
    )

    # Create a FreeCAD geometry. A FreeCAD can take vertices and faces as input
    mesh = Mesh.Mesh((mesh_values["vertices"], mesh_values["faces"]))
    # Ifc lenght internal unit : meter. FreeCAD internal unit : mm.
    scale_factor = 1000
    matrix = FreeCAD.Matrix()
    matrix.scale(scale_factor, scale_factor, scale_factor)
    mesh.transform(matrix)

    # Allow you to embed FreeCAD in python https://www.freecadweb.org/wiki/Embedding_FreeCAD
    FreeCADGui.showMainWindow()
    doc = FreeCAD.newDocument()

    # Add geometry to FreeCAD scenegraph (Coin)
    fc_mesh = doc.addObject("Mesh::Feature", "IfcMesh")
    fc_mesh.Mesh = mesh

    # Set Draw Style to display mesh edges. Orient view and fit to wall
    FreeCADGui.runCommand("Std_DrawStyle",1)
    FreeCADGui.Selection.addSelection(fc_mesh)
    FreeCADGui.activeView().viewIsometric()
    FreeCADGui.SendMsgToActiveView("ViewSelection")

    FreeCADGui.exec_loop()
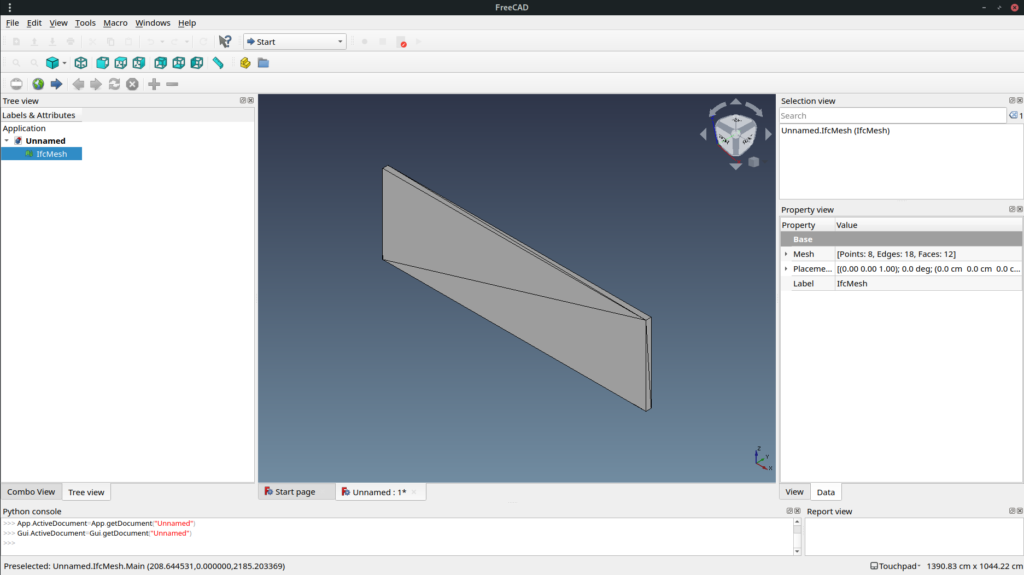
Resulting geometry in FreeCAD
Mesh is fast to display but it is usually not what you want to use in a BIM authoring software. So next time we will see how to generate a boundary representation.
import clr
clr.AddReference("RevitAPI")
from Autodesk.Revit.DB import *
from Autodesk.Revit.DB.Plumbing import PipeSegment

clr.AddReference("RevitServices")
from RevitServices.Persistence import DocumentManager
from RevitServices.Transactions import TransactionManager

doc = DocumentManager.Instance.CurrentDBDocument

#Les entrées effectuées dans ce noeud sont stockées sous forme de liste dans les variables IN.
dataEnteringNode = IN

elem = doc.GetElement(IN[0])

TransactionManager.Instance.EnsureInTransaction(doc)

for dn, di, de in zip(IN[1], IN[2], IN[3]):
	DN = UnitUtils.ConvertToInternalUnits(dn , DisplayUnitType.DUT_MILLIMETERS)
	Di = UnitUtils.ConvertToInternalUnits(di , DisplayUnitType.DUT_MILLIMETERS)
	De = UnitUtils.ConvertToInternalUnits(de , DisplayUnitType.DUT_MILLIMETERS)
	try:
		elem.AddSize(MEPSize(DN,Di,De,True,True))
	except:
		elem.RemoveSize(DN)
		elem.AddSize(MEPSize(DN,Di,De,True,True))

#Affectez la sortie à la variable OUT.
OUT = IN
Some Revit addins and extensions are adding many parameters to you project. Some are not even visible to the user. It means that you have to use API to remove it. In most common case you’ll never see it unless you use Revit Lookup. But when you export your model or do a duct pressure loss report it appears on it. So I made a script to get quickly rid of unwanted parameters (hidden or not).
from Autodesk.Revit.DB import *
from System import Guid

uidoc = __revit__.ActiveUIDocument
doc = __revit__.ActiveUIDocument.Document
app = __revit__.Application

#Retrieve all parameters in the document
params = FilteredElementCollector(doc).OfClass(ParameterElement)
filteredparams = []

#Store parameters which has a name starting with "magi" or "MC"
for param in params:
    if param.Name.startswith(("magi", "MC")): #startswith method accept tuple
        filteredparams.append(param)
        print param.Name #To check if a parameter in the list is not supposed to be deleted

#Delete all parameters in the list
t = Transaction(doc, "Delete parameters")
t.Start()
for param in filteredparams:
    doc.Delete(param.Id)
t.Commit()
When you work in HVAC, you always need fluid properties in your calculations. The most common property you need for pipe work is heat capacity Cp, mass density ρ and dynamic viscosity µ. We will use CoolProp which is an awesome open source cross-platform library developed in C++ with wrappers available for most common languages and environment (including python, Libre Office, Excel, shared library dll). You can thank developers and their supporters for this great library.
You may install CoolProp for python by typing “pip install CoolProp” in your command line (cmd.exe on windows) or with Anaconda.
You can then use it in a python script. Here is an example for Pure Fluid :
#Add CoolProp to your pythonpath
import sys
sys.path.append(r"PathToTheCoolPropFolder")
#Example, for me it is : sys.path.append(r"C:\Anaconda\Lib\site-packages\CoolProp-5.1.1-py2.7-win-amd64.egg")

#Import PropsSI function which will be used from CoolProp
from CoolProp.CoolProp import PropsSI

#Ask CoolProp water's heat capacity at 275.15 K (2°C) and common Earth pressure 101325 Pa
PropsSI('C','T',275.15,'P',101325,'INCOMP::Water') #return 4182.587592215201

#Ask CoolProp water's mass density and viscosity with same conditions
PropsSI('D','T',275.15,'P',101325,'INCOMP::Water') #return 1003.076063639064
PropsSI('C','T',275.15,'P',101325,'INCOMP::Water') #return 0.0016507819947969692
We often need mixture properties (ethylen or propylen glycol, ethanol etc…). Here is an example :
#Ask CoolProp the heat capacity of mixture Water/ASHRAE, Ethylene Glycol 25% (volume based)  at 275.15 K (2°C) and common Earth pressure 101325 Pa
PropsSI('C','T',275.15,'P',101325,'INCOMP::AEG[0.25]') #return 3684.7400408010444
#Ask CoolProp ASHRAE, Ethylene Glycol's mass density, heat capacity and freezing temperature with same conditions
PropsSI('D','T',275.15,'P',101325,'INCOMP::AEG[0.25]') #return 1043.3307802810543
PropsSI('V','T',275.15,'P',101325,'INCOMP::AEG[0.25]') #return 0.0032736727033664615
PropsSI('T_FREEZE','T',275.15,'P',101325,'INCOMP::AEG[0.25]') #return 261.0307763027968 (~ -12°C)